Aseprite is an incredibly powerful Pixel Art tool on it’s own, but did you know it’s possible to extend it’s functionality even further by writing your own plugins? Well you can! Today we’re going to take a look at how we’d do that to make a plugin that we specify a colour and how many shades and highlights we want, then it spits out a palette with all our colours. I’ve found this plugin to be super useful when shading or adding highlights, so let’s get started.
Once we’re done, our plugin will look like this:

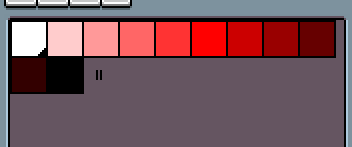
And will generate us a palette that looks like this:
First we need to know how to install and run scripts. This is pretty simple in Aseprite.
Adding Scripts
- Go to File -> Scripts
- Click
Open Scripts Folder - Place your scripts into this folder
- Restart Aseprite
Running Scripts
- Go to File -> Scripts
- Select your script from the menu
It’s really that easy.
Before we start
There’s a few things we’ll want to know before we get started. Firstly, plugins are written in Lua. If you’re unfamiliar with Lua, you follow along here to get started.
Next thing we’ll want to know where to see the API docs. Aseprite API is hosted publically in this repository. Here you can find all the hooks for your plugin, provided functions and more. Once you’re finished with this tutorial, you’ll want to check out the docs to make all the plugins you can think of!
Lets get started
Follow the steps above about adding scripts or navigate to the folder yourself. In the folder, we’ll want to create a new file called shade-palette.lua. Once you’ve got that, open it up in your favourite text editor.
We’re going to make the dialog first. This is pretty easy with the Dialog API. We can create a new dialog with Dialog(). To add buttons we can use Dialog():button on a dialog, colour fields can be done with Dialog():color and finally sliders can be made with Dialog():slider. With all this knowledge, we make easily make the dialog for the user to interact with the plugin with the following:
function showDialogForColour()

    return Dialog():color{ id="colour", label="Choose a color", color=Color{r=0,g=0,b=0,a=255} }
	:slider{ id="number_of_shades", label="Number of shades to generate:", min=1, max=20, value=10 }
    :button{ id="ok", text="OK" }
    :button{ id="cancel", text="Cancel" }
    :show().data;

end

showDialogForColour();
This will create a dialog with a colour picker which defaults to black and says “Choose a colour”, put a slider under which is set to 10 and can slide from 1 to 20, then add two buttons for OK and Cancel which do exactly as they say.
Now we have a plugin that shows a dialog, but nothing else. Let’s add some more functionality. Remove the last line showDialogForColour() and we’ll read the data coming back.
do
    local color = showDialogForColour()
    if color.ok then
		shades = color.number_of_shades;
        return app.alert(shades);
    end
end
First we’re calling showDialogForColour() which will display the dialog and wait for the OK to be hit. Then we’ll check if the element with the id ok which was the OK button is set, and if so, we’ll read the value of number_of_shades from the object which was set from the colour slider. Finally, we’ll alert this out to see the effect. Try setting different values for the shade count and see if change.
Two parts left to go. We’ve got to generate the new colours now and then put them into the palette. To generate the colours, we’ll take the hue and saturation of the base colour, then start at 1 for the lightness and reduce it each iteration until we hit 0. To determine how much lightness we reduce each colour by, we divide 1 by the selected amount of shades. This is because lightness goes from 0 (black) to 1 (white). We’ll start really bright and get darker, creating our shade gradient.
function generateColors(baseColour, numShades)
    local colors = {}

	local minusAmount = 1/numShades;

    for light=1,0,-minusAmount do
        local newCol = Color{h=baseColour.hslHue, s=baseColour.hslSaturation, l=light}
        table.insert(colors, newCol)
    end

    return colors
end
For the last function, we want to add the generated colours from generateColors to our palette. Here’s what it looks like:
function setColourPallete(baseColor, numShades)

    local colors = generateColors(baseColor, numShades)

	local spr = app.activeSprite
	if not spr then
	  return app.alert("There is no active sprite")
	end

	local pal = Palette(#colors)

    for i=1,#colors-1 do
		pal:setColor(i-1, colors[i])
    end
	pal:setColor(#colors-1, Color{r=0, g=0, b=0})

	spr:setPalette(pal);

end
Few things to point out here. We generate the colours in this function as we’re about to use them with local colors = generateColors(baseColor, numShades). But more interesting than that is the next part:
local spr = app.activeSprite
if not spr then
    return app.alert("There is no active sprite")
end
This is a check to make sure we have a sprite open before we continue. If you run the script and your don’t have a sprite open, then there’s no access to a palette and this will fail. app.activeSprite is part of the Aseprite Plugins API.
The last part we just grab all our generated colours, create a new palette and insert them in.
local pal = Palette(#colors)

for i=1,#colors-1 do
    pal:setColor(i-1, colors[i])
end
pal:setColor(#colors-1, Color{r=0, g=0, b=0})

spr:setPalette(pal);
Again, we’re using the Aseprite Plugin API here to create a new Palette and for the functions for setting the colours of each palette section. Last, we set the active sprites palette to this newly created one.
Now we just want to call the generate setColourPallete like so and we’re done:
do
    local color = showDialogForColor()
    if color.ok then
        setColourPallete(color.color, color.number_of_shades);
    end
end
Now if we run it, the process will look just like we showed at the top. This tool is super helpful for shading and making highlights on your art, I’d highly suggest it. If you make any modifications to the script, we’d also love to see them. Thanks for following along today!
Here’s the full script:
function showDialogForColor()

    return Dialog():color{ id="color", label="Choose a colour", color=Color{r=0,g=0,b=0,a=255} }
	:slider{ id="number_of_shades", label="Number of shades to generate:", min=1, max=20, value=10 }
    :button{ id="ok", text="OK" }
    :button{ id="cancel", text="Cancel" }
    :show().data;

end

function generateColors(color, numShades)
    local colors = {}

	local minusAmount = 1/numShades;

    for light=1,0,-minusAmount do
        local newCol = Color{h=color.hslHue, s=color.hslSaturation, l=light}
        table.insert(colors, newCol)
    end

    return colors
end

function setColourPallete(baseColor, numShades)

    local colors = generateColors(baseColor, numShades)

	local spr = app.activeSprite
	if not spr then
	  return app.alert("There is no active sprite")
	end

	local pal = Palette(#colors)

    for i=1,#colors-1 do
		pal:setColor(i-1, colors[i])
    end
	pal:setColor(#colors-1, Color{r=0, g=0, b=0})

	spr:setPalette(pal);

end

do
    local color = showDialogForColor()
    if color.ok then
        setColourPallete(color.color, color.number_of_shades);
    end
end